Table of Contents
STEP 1: THE CROSS
The very first step in solving a 3×3 cube is to build a cross in the bottom layer. For purposes of this tutorial, we’ll treat the bottom layer as white (making the top layer yellow). Remember, the face color is defined by the center cubie. We’ll build the cross in two stages: first, building a daisy in the top layer with the four white edges surrounding the yellow center; second, transferring those white edges into the bottom face to create the white cross.
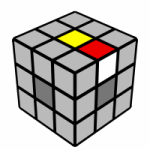
 The goal here is to create a daisy in the top face, as shown to the right — with a yellow center cubie (capitulum) and four edges with white facing up (petals). Ignore the corners; they’re irrelevant for this step.
Other parts of this tutorial will teach specific algorithms for each step. There are no such algorithms for the daisy. You need to form it intuitively, based on a few concepts with which you’ll quickly become familiar. Looking at a scrambled cube, you’ll initially find each white edge/petal in only one of four places:
| facing down in the white face
turn face twice to get edge into top layer |
  |
| facing sideways in the bottom or top layer
1. turn face once to get edge into middle layer |
 |
| facing sideways in the middle layer
turn face once to get edge into top layer |
 
|
| facing up in the top layer
PLACED |
  |


This chart actually makes it seem much harder than it is. After a few tries, you’ll see that you can place all four “petals” intuitively.
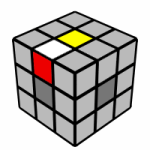
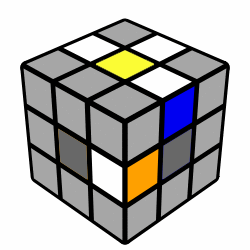 There is one complication, though. After you’ve placed some petals, you don’t want to displace them (undoing the work you’ve already done) when you go to place the next petals. In the example to the right, three petals are placed, and the fourth (orange/white) is just one R turn away from being placed. But you can’t do that R turn without knocking out the white/blue petal. You first need to move the white/blue petal out of the way. A U’ move will move the top layer counter-clockwise, opening up the space that previously had the white/blue petal. Then you can make an R turn to place the orange/white without disrupting the other petals. Voila!
Once you have the daisy in the top face, you’re only about 5 seconds from completing the white cross. Because the center cubies don’t move, if the daisy (with its yellow center) is in the top face, we know that the white center is in the bottom face. All that’s left is moving each of the four white “petals” into that bottom face next to the white center.
For each of the four petals, we repeat a very simple two-step process:
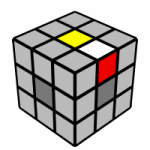
- Line up the colored (non-white) side of each petal over the center of the same color. If it is not already over a center of the same color, you will need to move the top layer (U or U’) until it is.
- Turn the face with that center color twice (180 degrees).
Here’s a short video example:
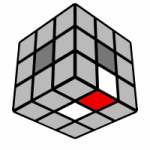
You should now have a white cross in the bottom face. Even more, each of the white edges is also placed so that its colored side sits under the center of the same color. Each of those four edges is “solved” in relation to the colored centers, as shown below:


This reveals the whole reason for the inefficient approach of first creating a daisy, lining up each petal over its side-facing center color, then placing each one into the bottom face. That process ensures that the four petals are properly oriented vis-à-vis each other and their corresponding center colors.
Congratulations! You’ve completed the first step. Now, onto the next step — the white corners….

2 thoughts on “The Most Spectacular, Stupendous, Sweeping, Slick, Straightforward Rubik’s Cube Tutorial the Web Has Ever Known (and Likely Ever Will Know) – Part 1 (White Cross)”