Two-Look OLL Guide

I’ve wanted to make this Two-Look OLL tutorial for a while, and finally found the time. Although the video embedded below is comprehensive (read: long) and should stand alone, this post’s further background and table of algorithms should help with learning/practice.

What is OLL?

The third-step in 3×3 solving under the CFOP/Fridrich Method is OLL (Orient Last Layer). By the OLL stage, with the Cross and F2L complete, the bottom face and first two layers will be solved. The goal of OLL is to orient the up face stickers (generally yellow for white-on-bottom solvers so that all are facing up and none are facing “out.”

There are 57 possible cases/states at the OLL stage, too many for most cubers to learn/remember all solutions. (Two years in, and I know only about 30 of them….) Two-Look OLL is designed to lighten the burden by breaking OLL into two steps. The first step (or “look”) of Two-Look OLL is to orient the four edges, forming a yellow cross or plus-sign (ignoring the edges). The second “look” orients the four corners so that yellow faces up, completing the top face. The center cubie is, of course, fixed and can never be “un-oriented.” As the Speedsolving Wiki summarizes:

[Y]ou do not need to know all 57 OLLs to use 2-look OLL, rather the system is divided up. By first orienting the edges (3 cases), then orienting the corners (7 cases), orientation of all pieces on the last layer is completed.

I think we all can agree that 10 cases is better than 57!?! Here’s a video teaching and contextualizing them:

Continue reading

Mouse OLLs (##3, 4)

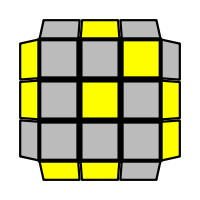
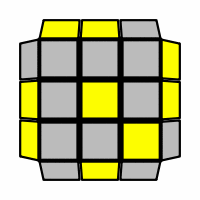
The Mouse OLLs (##3, 4) are hard. Not so much their execution (certainly the Sexy Move variants aren’t all that bad), but orientation. Where does that corner go? Top-right? Bottom left? And what about that side with just the un-oriented edge? Which is Mouse and which is Anti-?

Having concentrated on these OLLs quite a bit, I now no longer mind them. Here’s a simple table and video tutorial — its soundtrack a tribute to Lou Reed, RIP — followed after the jump by further explanation.

OLL 3 OLL 4 ORIENTATION
SEXY-BASED f (R U R’ U’) f’ (U’)
F (R U R’ U’) F’

oll3-sexy
f (R U R’ U’) f’ (U)
F (R U R’ U’) F’

oll4-sexy
oriented corner:
R layer

edge-only face:
F/B layers (not L/R)

SUNE-BASED M (R U R’ U) Rw
U2 Rw’ U M’

oll3-sune
M U’ Rw U2
Rw’ (U’ R U’ R’) M’

oll4-sune
oriented corner:
F layer

edge-only face:
L/R layers (not F/B)

(music: in tribute to Lou Reed, Velvet Underground’s “Rock And Roll” performed by Phish on 8.5.11; cubes: white Weilong with Cube Specialists fitted Bright+ stickers, black Zhanchi with Cubicle full-bright stickers)

Continue reading

F2L – Corner Placed, Edge in U

As though quoting Scripture, the entire community seems speaks in one harmonized voice when it comes to F2L:

Learn F2L intuitively. Don’t memorize F2L algorithms.

Yeah, ok. I get the point. Intuitively, it’s not hard to grasp pairing corners and edges and then inserting them. And it’s not hard to see how to do that in many instances — splitting pairs, using empty slots, etc.

But I do contend that certain F2L cases are anything but intuitive. In particular, I found completely non-intuitive the cases in which a corner is inserted (but flipped), with the corresponding edge in the U layer. Indeed, I’ve gotten in the inefficient habit of simply getting the corner into the top layer without regard to where (with a R U R’, for example), and then treating it, ahem, like an intuitive F2L case.

No longer. I’m committed to learning the four cases below. The first one is easy — a Sexy Move plus an easy peasy insertion. But the others are so damn similar that I find it nearly impossible to keep them separated in my head. Any suggestions?

setup pairing insertion
(R U R’ U’) (R U R’)
y’ (R’ U R U’) (R’ U R)
(R U’ R’ U) (R U’ R’)
y’ (R’ U’ R U) (R’ U’ R)